Page 2 of 6 FirstFirst 1234 ... LastLast
Results 21 to 40 of 103

Thread: R32 2-door Daily Streeter Rebuild

  1. #21
    Guest Will@666Custom's Avatar
    Join Date
    Feb 2010
    Location
    Alton, Hampshire
    Posts
    1,136
    Rides
    0
    Started preparing the Rear Subframe.


    Removed the old Liquid Filled Bushes.


    Got the Paint Stripper going.


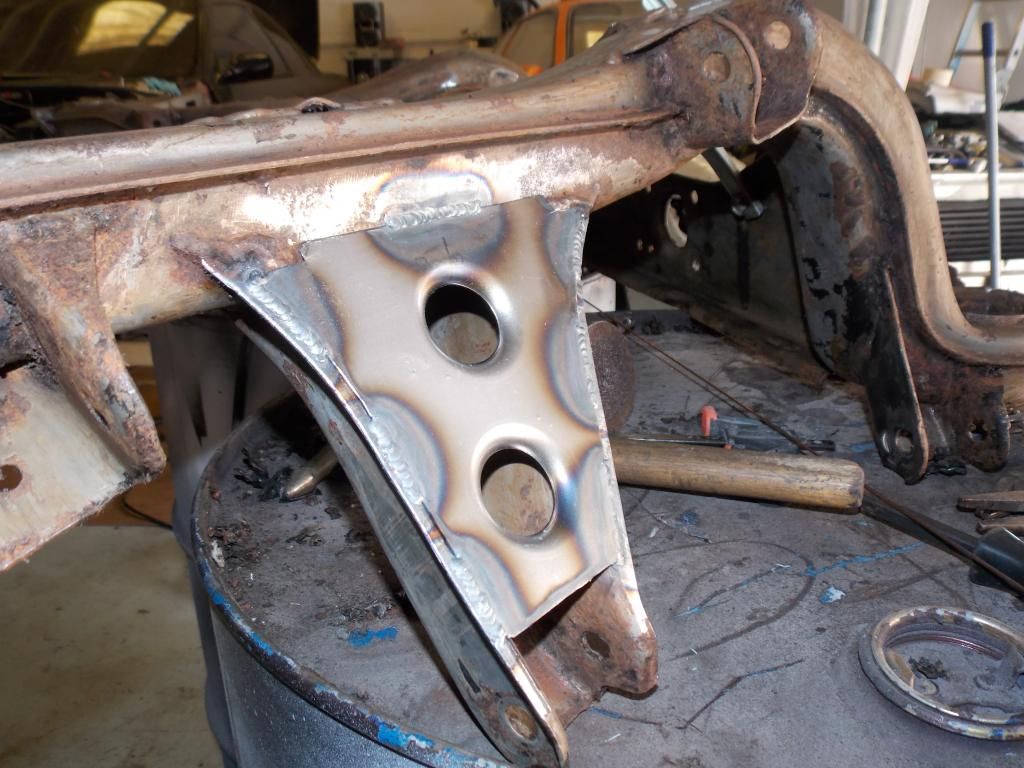
    I'm not going too mad with the Subframe as it's a daily, But I did decide to Brace the Camber Mounts as they have a lot of Flex in them normally.


  2. #22
    Guest Will@666Custom's Avatar
    Join Date
    Feb 2010
    Location
    Alton, Hampshire
    Posts
    1,136
    Rides
    0
    Had loads of fun removing the Bearings from the Front Uprights.


  3. #23
    Guest Will@666Custom's Avatar
    Join Date
    Feb 2010
    Location
    Alton, Hampshire
    Posts
    1,136
    Rides
    0
    Removed the Old Bushes from the Hubs and Lower Arms.

    And got most of the parts together ready for Acid Dipping, Zinc Plating and Powder Coating.


  4. #24
    Guest Will@666Custom's Avatar
    Join Date
    Feb 2010
    Location
    Alton, Hampshire
    Posts
    1,136
    Rides
    0
    I started De-greasing the years of crap from the Underside.


  5. #25
    Guest
    Join Date
    May 2013
    Location
    Aberdeen
    Posts
    248
    Rides
    0
    Really cool and tidy work. Love the HICAS delete! - Are you a fabricator by trade or just a really good hobbyist?

  6. #26
    Guest Will@666Custom's Avatar
    Join Date
    Feb 2010
    Location
    Alton, Hampshire
    Posts
    1,136
    Rides
    0
    Quote Originally Posted by greydesigns View Post
    Really cool and tidy work. Love the HICAS delete! - Are you a fabricator by trade or just a really good hobbyist?
    Thanks very much dude.

    I'm self taught.

    I've got a Unit, and I do work for others to help fund my Gambling and Stripper addiction.

  7. #27
    Guest Will@666Custom's Avatar
    Join Date
    Feb 2010
    Location
    Alton, Hampshire
    Posts
    1,136
    Rides
    0
    Managed to get the Underside fairly spotless.


    Then made a start removing any Rust that wasn't removed with the Wire Wheel.


    Got a couple of bits to go over, But it's mostly there.

  8. #28
    Guest
    Join Date
    Mar 2013
    Location
    Bucks
    Posts
    278
    Rides
    0
    Dude I always am impressed with the quality of work in all of your threads, gj.

    What are you painting on the rust to remove it?

  9. #29
    Guest Will@666Custom's Avatar
    Join Date
    Feb 2010
    Location
    Alton, Hampshire
    Posts
    1,136
    Rides
    0
    Quote Originally Posted by ratgreen View Post
    Dude I always am impressed with the quality of work in all of your threads, gj.

    What are you painting on the rust to remove it?

    Thanks very much dude.

    I'm using the Bilt Hamber Deox Gel.

    http://www.bilthamber.com/corrosion-treatments/deox-gel

  10. #30
    Guest Will@666Custom's Avatar
    Join Date
    Feb 2010
    Location
    Alton, Hampshire
    Posts
    1,136
    Rides
    0
    I had to make a few repairs to some random crap on the Floor Pan.


    I got the remainder of the Underside prepped.


    Also trimmed some material from the Wheel Arch where access to the Arm Bolts is often limited.


    And then prepped the Arches.


  11. #31
    Guest Will@666Custom's Avatar
    Join Date
    Feb 2010
    Location
    Alton, Hampshire
    Posts
    1,136
    Rides
    0
    And finally got to get some Stone Guard on the Underside.


  12. #32
    Guest Will@666Custom's Avatar
    Join Date
    Feb 2010
    Location
    Alton, Hampshire
    Posts
    1,136
    Rides
    0
    Added a couple of bits to the parts list.


    Uprated Nismo Gearbox Mount.


    And an XTD Lightweight Flywheel.


  13. #33
    Guest Will@666Custom's Avatar
    Join Date
    Feb 2010
    Location
    Alton, Hampshire
    Posts
    1,136
    Rides
    0
    I got the Powder Coated Subframe back.


    And installed some Solid Subframe Bushes.


  14. #34
    Guest Will@666Custom's Avatar
    Join Date
    Feb 2010
    Location
    Alton, Hampshire
    Posts
    1,136
    Rides
    0
    I refurbished the Fuel Tank.


    Including Straightening all of the Bent Edges.


    Straightened out the massive Dent.


    Took it back to Bare Metal.


    Then gave it a few coats of Stone Guard, with the built in Rust Inhibitor.


  15. #35
    Guest
    Join Date
    Mar 2013
    Location
    Bucks
    Posts
    278
    Rides
    0
    What process are you using to clean all these parts? It would take me hours to clean the underside of my car like that.

    Clean, paint remover, deox gel, wire wheel?

  16. #36
    Guest Will@666Custom's Avatar
    Join Date
    Feb 2010
    Location
    Alton, Hampshire
    Posts
    1,136
    Rides
    0
    Quote Originally Posted by ratgreen View Post
    What process are you using to clean all these parts? It would take me hours to clean the underside of my car like that.

    Clean, paint remover, deox gel, wire wheel?

    You'd be doing well dude, It took me days !


    De-greased with Brake Cleaner or similar.

    Wire Wheeled.

    Deox'ed.

    Etch Primed.

    Stone Guarded.

  17. #37
    Guest Will@666Custom's Avatar
    Join Date
    Feb 2010
    Location
    Alton, Hampshire
    Posts
    1,136
    Rides
    0
    I lightly refurbished the Fuel Lines.

    They'll probably get replaced at some point in the future.


    Replaced the Rubber Lines.


    And Refurbished the Tank Straps.


  18. #38
    Guest Will@666Custom's Avatar
    Join Date
    Feb 2010
    Location
    Alton, Hampshire
    Posts
    1,136
    Rides
    0
    Decided to Shave and Tuck the Engine Bay.


    Started by Removing the massive Washer Bottle.


    I always wondered what this was.


    Some random crap, So binned it off.


    Got rid of any random Brackets.


  19. #39
    Guest Will@666Custom's Avatar
    Join Date
    Feb 2010
    Location
    Alton, Hampshire
    Posts
    1,136
    Rides
    0
    Then concentrated on moving the Fuse Box somewhere less obvious, But still practical.


    I modified the Base.


    Made a Threaded Boss.


    Welded it in.


    Re-worked the Hole that was already there, to accept the Base.


    Then made a Bracket that Locates the bottom of the Base.


    The Base then Locates on the Bracket and Bolts down on the Boss.


    With space underneath for Cable Entry.


  20. #40
    Guest dandan's Avatar
    Join Date
    Jun 2006
    Location
    nr Coventry
    Posts
    2,360
    Rides
    0
    I guess that random bar might have been to stop the bulkhead flexing under braking, could be worth installing something suitably bling to replace it with...
    I might be wrong though

Posting Permissions

  • You may not post new threads
  • You may not post replies
  • You may not post attachments
  • You may not edit your posts
  •