Page 9 of 10 FirstFirst ... 78910 LastLast
Results 161 to 180 of 182

Thread: Almost-a-Kouki 180SX

  1. #161
    Guest zeppelin101's Avatar
    Join Date
    Sep 2008
    Location
    Leicester
    Posts
    9,760
    Rides
    0
    I've had lots of parcels turn up this week. Most of them not terribly exciting (carbide cutters, for instance) but one that very much is...


    Picked them up second hand. They are 207-E spec: click me!

    In summary, a lot of overlap (38° @ 1 mm lift on a 4 valve head is not to be sniffed at) a decent wedge of lift and in theory lots of power potential.

    Depends what can be done with the ports but these have enough lift area to provide well over 100 hp/l on a reasonably well flowing head with individual throttles and tuned exhaust manifolds. Unfortunately, a 1UZ is not a great flowing head out of the box (efficiency measured relative to the throat diameter is less than 50% on the intake and exhaust!), but I'm confident that there is a lot that can be done. The valve seats for instance are single cut at 45° which is very inefficient, the short side is a tight radius and there is some shrouding to take out of the intake and exhaust valves in the chamber.

    My spare head turned up which I'm going to get sliced soon so I can see how much I can mill off the fire face and what potential there is in the ports without breaking through any where.
    Last edited by zeppelin101; 05-02-2016 at 06:47.

  2. #162
    Guest zeppelin101's Avatar
    Join Date
    Sep 2008
    Location
    Leicester
    Posts
    9,760
    Rides
    0
    Update time...

    Some rebuild bits will actually be arriving today. Eagle Rods and ACL bearings for starters. £70 in duty to pay though which kinda sucks but hey, still got the lot for less than £750 which is pretty good value if you ask me!

    In the mean time I bought some stuff to make moulds out of silicone with so I could take some moulds of the ports and see how they look. It's two part stuff, the base and an activator mixed at 10:1. I also bought some stuff called Thixo which I didn't use on my first attempt but the silicone just ran everywhere and was too thin to be of any use. The second time (this one) I probably put too much in (it's mixed at 40:1!) so it was quite tricky to work with and is why it is absolutely everywhere in the pics below. Luckily I got away without too many air bubbles and the ones that are there are small.

    After stuffing it in everywhere:


    ~6 hours later...


    They don't look that bad really. Not great, but not too bad. There is a lip where the machining of the port throat meets the casting which can be removed which will help, beyond that the main restriction looks to be the valve guide. Unusually, it doesn't look like the guide is supported by a boss as such to help with heat transfer so if I machine down the guide then the valve will have less support along it's length. I don't think this is desirable from a longevity point of view unless I get creative machining the valve as well by adding a groove in the head to ensure that the head can conform to the seat when it gets hot if it is moving radially on the seat.

    The seat is where most of the work needs to happen, it's a single 45° cut which in terms of flow efficiency is probably about 40-50% efficient, so replacing this with a 4 angle job is going to be paramount to getting some flow back.

    What's quite interesting is that the ports are very short and asymmetric. One leg is longer than the other and also has a more gentle radius on the floor into the throat area. This is actually quite good from a flow point of view but the other side is tighter which will separate flow at high valve lift from the short side and reduce flow. I can see why they have done this - with the engine using EGR as designed it's important to generate good charge motion in the chamber at the expense of some flow to ensure everything is nice and mixed up at ignition. Since the EGR circuit has gone in the bin, I can worry more about flow and get rid of some of these features, or at least massage them.

    I had an idea looking at it last night of making the most of the asymmetrical design and actually widening the longer leg and potentially installing a larger valve on that side while bringing the floor up with Devcon or some such on the shorter side and increasing the short side radius. This will almost certainly generate some swirl in the combustion chamber but ultimately could lead to optimising the shape that is already there and getting a lot of flow back.

    To put some perspective on the port flow versus what the port throat can theoretically flow, I put these together. I know, we all love graphs and what not...

    Intake:


    Exhaust:


    Out of the box they are both less than 50% efficient compared to the throat (which is a standard thing to compare against). The x-axis is Lift / Diameter to normalise the dimensions. That means it can be compared to loads of other engines too. These numbers are a bit loose but most of the numbers I've found for a stock port agree with these numbers so they are a good starting point. As a rough guideline, a reasonably good port should be 60-70% efficient at max lift which and can get close to 100% at low lift depending on the valve shape, valve seat geometry and the nose of the port.

    Lots to do still!
    Last edited by zeppelin101; 29-06-2017 at 08:04.

  3. #163
    Guest zeppelin101's Avatar
    Join Date
    Sep 2008
    Location
    Leicester
    Posts
    9,760
    Rides
    0
    Bits have been arriving:


    Yes, that is a carburetor Got everything to rebuild the fuel system from the tank to the engine for less than £1000 from the US, even with the exchange rate going all over the place.

    Also in the post, forged pistons from CP which should bring me up to ~11.5:1 CR. I'm getting quotes from Lexus for remaining build parts that I need. Hopefully by the end of September the bottom end will be assembled.

    Once the pistons turn up I can get the block bored, honed and milled. Heads are almost finished so they are almost ready for final milling and getting valves lapped in and cams installed.

    Getting somewhere at long last. Once the bottom end is assembled I can loose fit the heads and set about making some mounts up and see how much space I've got.

    Exciting!

  4. #164
    Guest zeppelin101's Avatar
    Join Date
    Sep 2008
    Location
    Leicester
    Posts
    9,760
    Rides
    0
    ... another box turned up.


    Off to the shop for bore and hone!

    Sent from my Nexus 5X using Tapatalk

  5. #165
    Guest zeppelin101's Avatar
    Join Date
    Sep 2008
    Location
    Leicester
    Posts
    9,760
    Rides
    0
    More things...


    Custom head gaskets at 1.0mm rather than standard 1.3mm to tighten up the squish region a bit.

    The box of Toyota bits are rebuild parts for the oil pump and head bolts. I didn't see the value of spending 2x as much on ARP studs since I'm not planning on having the engine apart every weekend. The differences in clamping load between a stud and a bolt is minimal, but with a stud the load can be applied several times without having to replace it.

    I also took the steering rack apart and modified it so that it is non-PAS. Didn't take too long, I just need to set the preload, get new bellows and track rods and the rack is good to go.

    The vibra-technic mounts are really nice, not cheap though!

    Sent from my Nexus 5X using Tapatalk

  6. #166
    Guest zeppelin101's Avatar
    Join Date
    Sep 2008
    Location
    Leicester
    Posts
    9,760
    Rides
    0
    Block machining all done.


    And cam gears eased for the much bigger lobes of the new cams


    It was worth the money getting it balanced. Apparently the pistons the the crank balance off massively so needed two new tungsten weights to bring it back. Would have ended up breaking the damn thing first time it revd up!

    Sent from my Nexus 5X using Tapatalk

  7. #167
    Guest zeppelin101's Avatar
    Join Date
    Sep 2008
    Location
    Leicester
    Posts
    9,760
    Rides
    0
    Time to get building!


    I had the crank measured properly, but for how little plastigauge costs it's always worth a look with it. Very good tool for checking journal taper as well.

    1 & 2:


    2 & 3


    And 5:


    And some measurements to check.

    1:


    2:


    3:


    4:


    5:


    I had picked up wider clearance bearings from ACL in the first place which were intended to give 0.025 mm over standard. This is quite a bit really, but mains 2-4 are at maximum by the book and 1 & 5 are a little over. This isn't really an issue if there is sufficient oil volume flow to the bearing. The intention was to modify the oil pump to be a little more efficient and run a 50w oil in place of the 40w recommended from Lexus. This will jack the oil pressure up (which would have been reduced by the wider clearance) and provide sufficient volume for cooling and lubrication.

    Sent from my Nexus 5X using Tapatalk

  8. #168
    Guest
    Join Date
    Jun 2005
    Location
    Wherever I run out of petrol!
    Posts
    14,549
    Rides
    0
    Full on build, didn't expect anything less from you Tom.

    Cant wait to see this in action when its done

  9. #169
    Guest
    Join Date
    Jun 2005
    Location
    Wherever I run out of petrol!
    Posts
    14,549
    Rides
    0
    Full on build, didn't expect anything less from you Tom.

    Cant wait to see this in action when its done

  10. #170
    Guest zeppelin101's Avatar
    Join Date
    Sep 2008
    Location
    Leicester
    Posts
    9,760
    Rides
    0
    This is on hold at the moment on account of an imminent new arrival in the family.

    I'm debating sticking an SR back in for now so I can get the thing moving and storing the V8 for the time being. It still needs a lot of money spent on it and I don't think I'll be able to invest in it properly for a long while yet.

    If anyone has an engine / box etc available please get in touch.

  11. #171
    Guest zeppelin101's Avatar
    Join Date
    Sep 2008
    Location
    Leicester
    Posts
    9,760
    Rides
    0
    Since there is a lack of SRs and the like for sale I thought I may as well crack on with the V8. That and constant teasing from the family about finishing it motivated me some!

    Got the heads finished up, valves lapped in and skimmed. I've taken quite a chunk off the face, circa 0.3mm but it leaves me with a healthy amount of squish and no masking of the back of the valve. I had targeted a CR of 11.5 and had to take an educated guess at the head volume but happily I was only out by a small amount and the final CR averages out to 11.4.

    Skimmed faces:


    Back of the intake valve is pretty clear, should help with flow.


    Wasted no time getting heads on, first one done:


    Second one with everything painted up.


    Timing gear is on the way from the US, might be here next week. In the mean time I need to measure all the valve clearances so I can order my one piece lifters. They'll be coming from Australia but are 1/3 of the price of OEM lifters! Usefully there is only one or two companies that make lifters for OEM volumes so there are only a limited number of diameters but lots of thicknesses. Should have no trouble getting the right parts. Saves a good wedge of valve train weight too as a bonus and means the top end is robust to ~9000rpm.
    Last edited by zeppelin101; 31-03-2017 at 20:52.

  12. #172
    Guest
    Join Date
    Aug 2005
    Location
    Cambs
    Posts
    1,017
    Rides
    0
    Last couple of posts sound epic, I need to go back and catch up on your previous updates, keep up the progress mate!

    Sent from my A0001 using Tapatalk

  13. #173
    Guest
    Join Date
    Sep 2013
    Location
    Porto
    Posts
    64
    Rides
    0
    Quote Originally Posted by zeppelin101 View Post
    As a side project, I've been looking into suspension geometry at the front. I had a couple of ideas namely:

    • Look at what the geometry is at the moment - how bad is roll centre specifically and what other implications this has
    • How much do the stock components weigh?

    I've weighed most of the important bits:

    • Upright = 6.1 kg
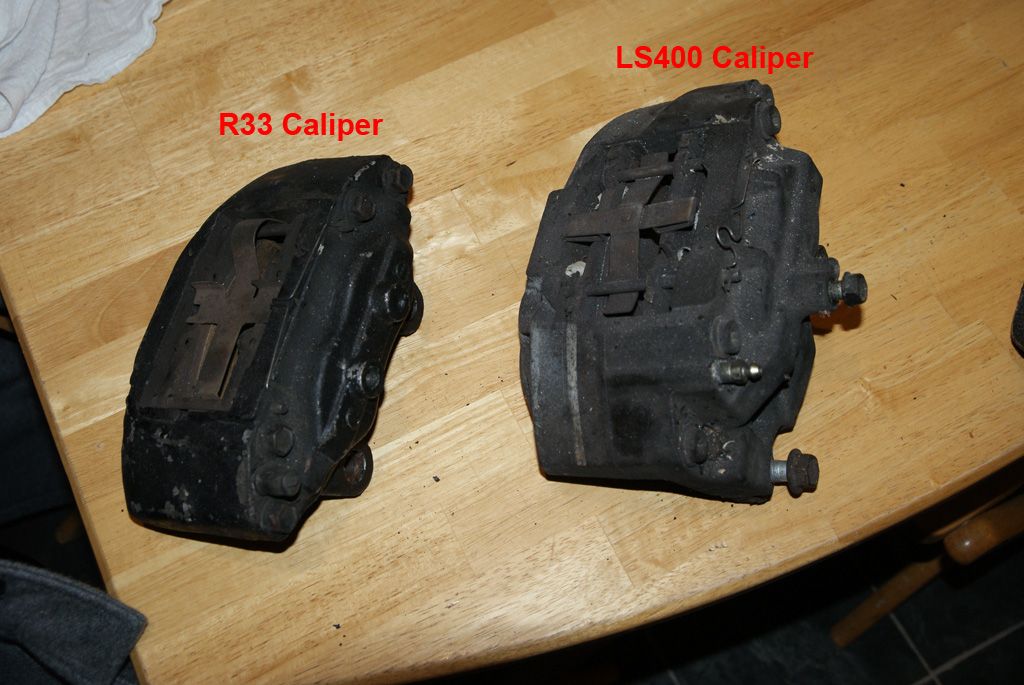
    • R33 Caliper = 3.8 kg
    • S14 Lower Control Arm = 2.2 kg
    • Tension Rod = 1.5 kg
    • LS400 Caliper (for reference) = 5.1 kg

    I kept hold of the LS400 calipers because they take a bigger disc and pads etc are cheaper with a good selection available - they appear to be popular with the Supra boys as an upgrade. I'm wondering now though if I should be looking at ally Z32 calipers and not worry about cost of pads to benefit from a weight perspective. Here is the two side by side:


    I've started drawing something up in CAD for the upright using 6083-T6 (7075 would be nice but is more expensive and a little unnecessary) as the material guideline just to see where I get to. In terms of weight, I'm looking to halve the weight of the uprights which I think I'll exceed because having put together the main body with caliper mounts it was ~800g with the steering arm and balljoint section to add on. I've calculated; very approximately with a tolerance of about 20mm, that I would like to move the lower balljoint by approximately 75mm - which is a huge amount! The implications of doing that are quite huge with respect to scrub radius etc so I need to spend a bit of time thinking about how best to set the geometry. To be clear - I'm not interested in returning the car to "stock" because it has a completely different engine among other things so the boundary conditions for CoG height etc are a bit different to what they were. I have options this way to consider how to make the steering manageable in the event I remove the PAS to facilitate fitment of sexy exhaust manifolds because it's on the drivers side where space is tightest.

    If my calcs are even close to right then the front roll centre (assuming the arch sits 45mm above the top of the wheel) is just over 1 meter below the ground which is not entirely unbelievable, even for a not very low ride height when you look at the arm angles. Imagine how bad it is when the car is sat on the deck tucking tyre!

    This is hugely overkill and I'm just keeping myself busy so it might come to nothing. I could be out in the garage playing with the V8, but my oven decided that cooking was no longer its top priority so I'm all out of cash now replacing that At least this is free!
    Nice build bro..

    One thing.

    LS caliper is straight forward on S Chassis?

  14. #174
    Guest zeppelin101's Avatar
    Join Date
    Sep 2008
    Location
    Leicester
    Posts
    9,760
    Rides
    0
    Quote Originally Posted by tomo1 View Post
    Last couple of posts sound epic, I need to go back and catch up on your previous updates, keep up the progress mate!

    Sent from my A0001 using Tapatalk
    Cheers, it's all pretty over built in the hopes it will take what ever I throw at it. I'm getting quite into drag racing ATM so I'm leaving some options on the table in case. The bottom end will take over 800hp as built all day long but i wont want to rev it past 8400 really because things start to go wrong then. I have a feeling the crank is too heavy and not stiff enough to do more than that for long periods of time. Not many people going up to 9k with these engines, most of the ones that have done have blown up a lot.
    Quote Originally Posted by humidade View Post
    Nice build bro..

    One thing.

    LS caliper is straight forward on S Chassis?
    You will need some adapters, the mounts aren't parallel to the calliper body if that makes sense? I still have them in the garage somewhere I'll get a picture. I've decided not to use then because they weigh the extra 1.3kg per side. I need to be cutting weight from the front really not adding it!
    Last edited by zeppelin101; 01-04-2017 at 15:41.

  15. #175
    Guest zeppelin101's Avatar
    Join Date
    Sep 2008
    Location
    Leicester
    Posts
    9,760
    Rides
    0
    I'm considering parting the engine out. I haven't got the time to do it justice and money will be tight for a few years thanks to the extraordinary expense of nursery. I don't fancy having bits of engine sat around for years waiting for me to get around to it because I'll just have to do everything again.

    So, if anyone is interested in a high comp built bottom end for a 1UZ, ported heads, exciting cams etc then drop me a message. I have no idea what to price it at - I know what it's cost me and how many hours I've put into it but there isn't really anything else out there to compare to.

    The full spec and what's included:

    Forged custom order CP Pistons for 11.4:1 CR (heads skimmed down to ~42.5 cc)
    Rings gapped to 0.016" top / 0.02" second
    286° duration cams (Kelford 207-E)
    Kelford springs (stiffer)
    Eagle rods with ARP bolts rated to ~800hp
    ACL race rod and main bearings
    Mahle thrust bearings
    Custom Cometic head gaskets (0.04" / 1.016mm thick)
    Blueprint timing gear (new water pump, belt, tensioner etc)
    Rebuilt oil pump with genuine Toyota parts
    New Toyota head bolts (didn't see the value in studs as I didn't plan on pulling the engine apart frequently)
    Bore machined to 88.5 mm and full hone to CP spec
    Block face skimmed flat
    Full rotating assembly balance and crank modified to suit new rod / piston mass (this was a small fortune!)
    3-angle valve cut
    Head face skimmed by ~0.3mm flat for CR
    New alternator bracket and bolts to tension drive belt on alternator and remove PAS and A/C from serptentine
    Heads ported - intake port smoothed over short side radius, splitter sharpened up and valve seats blended. Exhaust ports smoothed and finished to 320 grit to minimise carbon pickup. Chambers finished to 240 grit. Valves lapped in.

  16. #176
    Guest
    Join Date
    Jun 2009
    Location
    walsall/tamworth
    Posts
    6,746
    Rides
    0
    maybe worth speaking to that Thomas zerwowski (SP?) guy as he like sticking 1uz's in things for people.

    shame your selling up.

  17. #177
    Guest zeppelin101's Avatar
    Join Date
    Sep 2008
    Location
    Leicester
    Posts
    9,760
    Rides
    0
    I'll see if I can get hold of him thanks

    I jumped in the deep end, when I should have just got the engine in the car and working then ripped it apart later. Even after building it I still need to get it in the car and working, it's just too much to do.

    20/20 hindsight and all that.

  18. #178
    Guest zeppelin101's Avatar
    Join Date
    Sep 2008
    Location
    Leicester
    Posts
    9,760
    Rides
    0
    So it's gone to a new home. Needs must and that but I'm not terribly happy about it. Hope to be back in another one day.

  19. #179
    Guest
    Join Date
    Sep 2005
    Location
    Northamptonshire
    Posts
    21,374
    Rides
    0
    That's disappointing Zep. Sorry to hear it.

    You still at JLR?

  20. #180
    Guest
    Join Date
    Sep 2006
    Location
    UK
    Posts
    919
    Rides
    0
    That's a shame, was always hoping to get the call or Pm that it was going back up for sale. Hope it has gone to a good home though

Posting Permissions

  • You may not post new threads
  • You may not post replies
  • You may not post attachments
  • You may not edit your posts
  •