Those are the same as Mark's photo. You can see the individual pistons on the calipers (it's just difficult to see on your photo as they are dark) unlike the ones the OP has fitted.Originally Posted by Jonny Wilkinson


Those are the same as Mark's photo. You can see the individual pistons on the calipers (it's just difficult to see on your photo as they are dark) unlike the ones the OP has fitted.
Engine bushes upgraded to competition spec. Fully polybushed FIA suspension and geometry kit. Upgraded front ARB. Also Bilsteins, Shortened GTA spec steering arms, Late model LSD equipped axle. Will build a watts linkage for the rear if necessary.
- Jim
The brakes are Mazda FD3 with Mazda scraped off painted red and Alfa Logos put in place (wasnt sure of the AR logos but I can always paint over later).
I am trying to see how long I am allowed on an Alfa track day before anyone spots the mods.
- Jim
Last edited by Alfaholical; 16-05-2011 at 11:15.
Nice work on thoseI think it'd be interesting to tell people they're rare Alfa 4 pots from 1972 or something, see who believes you

That many Jap parts on this it may be the first Alfa ever that is reliable
Very nice on the suspension :-) Looking forward to seeing some more build pictures :-)
[For the track day] Just get a decent bonnet lock on the car.. and ensure you have a decent undertray lol. Oh, and don't forget about noise level, you won't be allowed on track without it being under the noise limit don't forget.
Daz, I know what Mark posted were 14 calipers and I know what I fitted to my own car.
I was trying to subtly point out that what the OP had gone to a lot of trouble to buy from ebay was pretty much what he already had sitting on his donor car and could have re-purposed. Mark posting pictures of nasty, crusty calipers with no disks wasn't helping my point so I posted a pic that showed what he could have made fit to a hub requiring a 4-stud pattern.
Lol, I'm not having a good morning so far. I should of stayed in bed lol.
To be fair, they would have had Nissan on the side unlike the Mazda calipers, unless he had the detailing taken off. BTW.. to get Ali calipers like the Mazda's (if I'm reading his post correctly) he would have had to have got Z32 calipers, so would have have to have bought something else anyway. (Although I saw exactly what you were saying).
Excellent project!
I doubt S14 calipers would have gone on as easily, as the Mazda ones have a wider centre to centre mounting hole, which is allowing him to squeeze the mounting holes either side of his original mounting holes
Also the disc thinkness is different. S14 calipers take a 30mm disc where as the Mazda ones are about 24mm
Awesome project thoughgood luck
Dan
Hey Jim
It was following your project that got me registered and a new thread started.
- Jim
Exactly right. I want to keep the unsprung weight down so ali calipers was a must. Going from plain disks and iron 2 pot calipers to vented and ali 4 pot adds 700g per side. I may save up and go for some ali belled rotors some day and then the I will be in net credit.
There are kits out there for just shy of a grand but my setup cost me roughly £300 (approx £100 was on Ferodo DS2500 pads).
- Jim
Last edited by Alfaholical; 16-05-2011 at 18:21.
Love this project
Old school cars with modern power plants and mechanicals are awesome. The reliability and performance of the modern tech coupled with the style and rarity of the classic car, win win in my book.
Couldn't give a stuff what engine you're putting in there, it's your car and it is going to be a serious toy when it's finished (although judging by the speed of updates it is either already finished or very close to being finished!).
Will be following this with interest
For the first 30 seconds of reading this thread I hated it, but have now completely changed my mind. Incredibly pretty little car, modern, reliable engine with a decent slug of power. It's not had it's soul removed, it's just had it changed.
I love it.
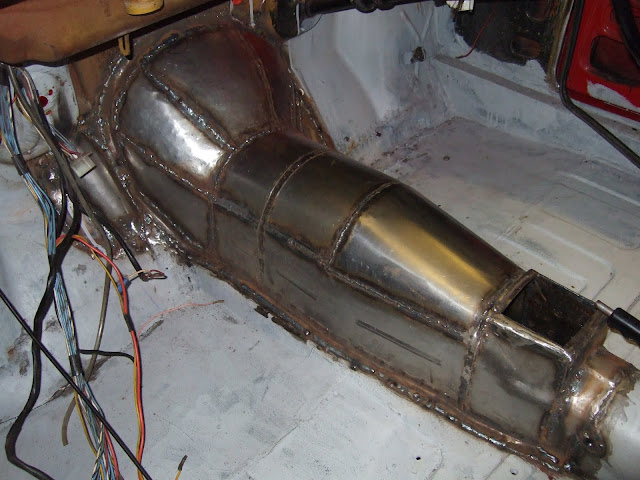
Once the car was back from Powerspeed with it's shiny new exhaust system it was time to fit the tunnel that Ed had beautifully fabricated.
As you can see the gear leaver hole has been opened up so as not to stress the gearbox cover plated ring (not sure what its called... the bit the gearlever goes through) when the engine rocks. We had to cut another 5" x 8" section out of the footwell to allow a bit of extra clearance around the exhaust downpipe. Another piece of Alfa for the loft to go with the tunnel.
A bit of dressing with the grinder and the interior was ready for paint. I am fitting a roll cage so I am going to be doing quite a bit of touching up but I wanted to get some paint protection on the tunnel.
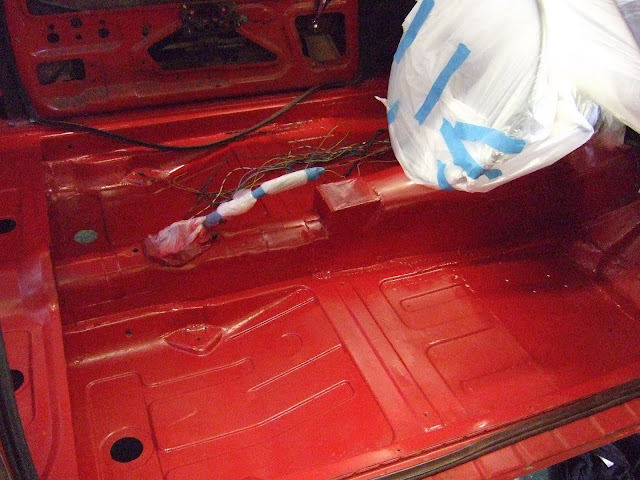
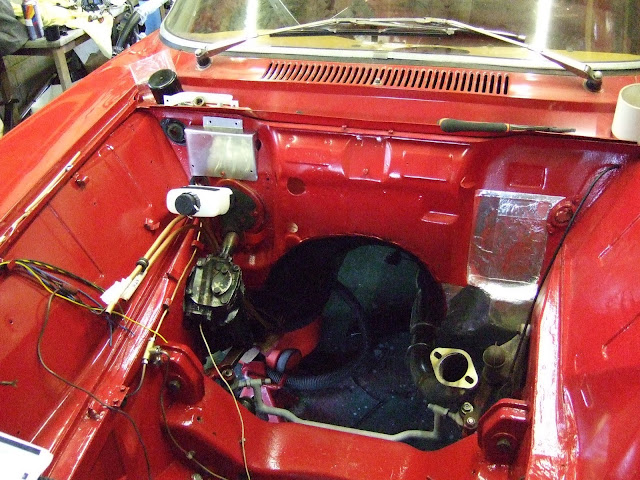
While I was in painting mood I pulled the engine out and cleaned the engine bay of 40+ years of grime. The old Nord engine leaked plenty of oil which preserved it from rust well, but all this grime had to come off so as to have a clean engine bay.
I spent an age masking up the interior to avoid getting paint where I didnt want it. Decorating sheet and masking tape worked well and I was impressed with how well rattle cans with 2k worked. If anyone does this make sure they have the correct mask and eye protection as 2k is horrible stuff and its not worth the risk of getting it in your lungs.
As mentioned previously the weak point of the early Sprint GT braking system was that it was single circuit. A bit of originality I could do without. I could have gone for the later tandem system but the master cylinders are rare and stupidly expensive. There are aftermarket twin cylinder systems available but at dual circuit systems but I choked at nearly £600 and that is without a hydraulic clutch conversion.
The pedals on the Alfa are floor mounted with the master cylinders exposed to all the road can through at them causing all kind or corrosion issues and leaving them exposed to getting a whack from kerbs (street and circuit) so I went on the hunt for an alternative.
The Alfa footwell bulkhead is half engine bay and half wheelarch so the usual solution of fitting the master cylinders through the bulkhead would be challenging, particularly as the bulkhead is a very curved (like the end of a bath...not the tap end!). Hanging pedals would have required a lot of fabrication and again chopping up the originality of the car.
After much searching I came across the rear facing master cylinder system made by OBP. OBP are well known in racing, kit cars and the aftermarket world. They manufacture decent quality products at reasonable prices. They sell a complete set of 3 pedals incl master cylinders and bias adjuster for less than half the Alfa aftermarket equivalent.
With the engine out I fitted the brake, clutch and fuel lines. The latter was 7m of 10mm copper pipe providing feed from the tank and back again. Thanks to my mate Lee who helped me with this. I have a mandrel to bend it but in reality thumbs and knees worked well also by careful bending I could avoid joints and only had to solder one 90deg elbow. I used soft copper from the pedals to the engine bay and kunifer in the engine bay and under the car as it is much tougher.
An alloy plate covers the master cylinders to rest your heels on.
Much headscratching accompanied how to do a 90 degree bend on the throttle cable but Mr Yamaha supplied a tight 90degree motorcycle throttle tube and once pointing in the right direction it was simply a case of using a teflon lined venhill universal m'bike cable to get it to the throttle. Pedal travel is a bit longer than perfect so I may get one of those smaller throttle pulleys.
More on that later...
- Jim
Last edited by Alfaholical; 27-12-2012 at 15:50.
You're doing a massive project man and I like the quality. I know how much work you've done, but it's a lot of fun as well!!!
As for the motor choice, each to their own but I had 2 non-turbo s14's and few turbo ones and there's nothing on earth to convince me to an n/a motor in 2l class. If it was a huge american v8 lump then that's another story, no turbos needed. If turbo choice/wastegate control/mapping is done properly there's no noticeable lag. Power delivery can be quick and smooth as on ANY 2l n/a.
I think you made a right decision, old engine/gearbox would be a waste of time in reliability terms and after squeezing more power it would become un-driveable on the street.
[QUOTE=Rob_SX;5813372]an idea almost worth doing!
I've just finished CA18det into s14 and Mitsubishi Evo TD05 twin scroll turbo onto CA18det. Easy electricals, easy to diagnose, easy to fix, fast enough. The Silvia had previously a non turbo sr20de, piece of junk.
Photo done during testing for boost leak:

Awesome project.
The Alfa originally came equipped with low back seats with seat belts that flopped over your shoulder without giving much attention to safety. This was an area I was not willing to accept (the one area I wasnt going to compromise to maintain originality is safety). So a roll cage and decent belts and seats are a must.
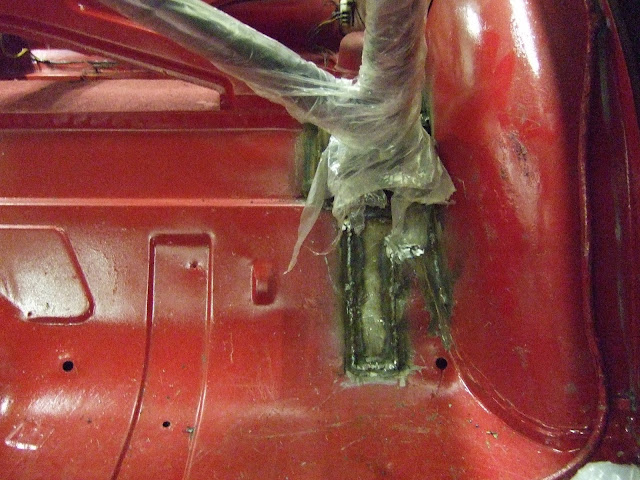
As with most 45 year old cars there will be some corrosion. My Alfa was restored in the mid 90's and on the whole the restorer did a good job. While painting I did find one area that needed attention. And after all there is little point in attaching a roll cage to rust so it need to be fixed. I could have had a go but Ed was on the case in no time the old corroded steel was cut out and replaced with fresh. It is now nice and strong.
I scratched up the floor quite a bit putting the rear cage in so I will need to tidy this up later.
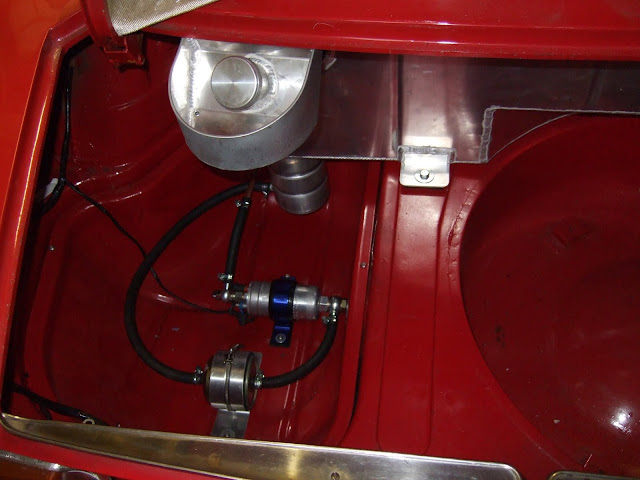
While I was at it I also panelled up the bulkead so that the boot and tank is clearly separated. The panels were in 2mm Ali and I did consider for a minute leaving them in bare ally but I decided to drill the rivet holes, clean up, acid etch and paint.
My Bosch 044 pump and 300ZX filter had turned up so I finished installing these in the well that was the bottom of the old tank. Bryn had included a lovely splash bowl with my tank so I fitted this too. Some of the Alfa guys fit their gel batteries here too but I really don't fancy having anything sparky near the tank, pump, fuel vapours etc. I decided the battery would be either in the passenger compartment or under the bonnet.
The car has a fuel flap and some people weld these up with the competition tank but I has just put in a butyl seal that will keep all the water out and stop access to the boot. The new tank uses the Alfa sender unit so other than extending the wires I can use the original gauge. Sound simple ....not really more on this later.
After fitting a brake light switch into the front brake circuit I could install the fluid reservior a nice tripple job from Car Builder Solutions that does both brake circuits and clutch along with a low fluid level indicator. The original Alfa brake system would let you know when there was no fluid by allowing full pedal travel with little slowing until you hit something
I have also installed so high tech heat shielding to the bulkhead I have applied even more than this since the pic (as I expect the turbo will be getting nice and toasty).
A load of suspension parts which I sent off for blasting and powdercoating had come back and I was running out of jobs to do before dropping the engine back in. More on that later.....
- Jim
Last edited by Alfaholical; 27-12-2012 at 15:43.
 Posting Permissions
 I was thinking more...
 Reply With Quote