Ive got a Defi BF Boost gauge in white with red needle, and the controller if your intrested mate?

Ive got a Defi BF Boost gauge in white with red needle, and the controller if your intrested mate?
Liking the engine bay, what paint did you use? normal kuro black rattle can?
how much do you want for them mate? hows your car getting on, i see the pics on facebook of the underside sandblasted, gonna be awesome when its doneOriginally Posted by crouchy

i used 2k solid in VW jet blackeventually i will be painting all inner arches and floor pan but won't be till next summer now

there are two things missing, the power lead to the controll box, and the long cable which plugs into the gauges from the box. these can be bought cheap from the states tho. i have the power lead in my loom which is in a big box, i will try and remove it.
I would be after £100 for them delivered mate
im definitely intrested let me see if i can source the missing parts 1st
cheers bud i was gonna ring jez tomorrow, do you think you would be able to find the power wire then?
yea i can get it for you on sunday mate
long and overdue update
since finding out i may not have a job on xmas eve, i haven't really touched the shell as i haven't had any really had the motivation to do anything on it, since my last update i sold the kouki front and rear bumpers, headlights, coilovers, gearbox and engine, only to cover me just incase i go on the rock and roll
even tho i have sold the engine and box, i have them both sorted, i brought another s14 off a friend of a friend that was moving aboard, i orginally brought it sell to a member that was looking for one, but pulled outwith the money i was going to make of it i was going to buy my mates front end fire damaged s14 for the engine and box. so the donor car i have is a 1995 s14 auto, yes i will be doing a breaking thread very soon
as for gearbox i got my hand on a skyline gts-t gearbox from 56km car, i was well chuffed when it turn up as i was just expecting the gearbox i got the gearbox xmember and prop i need is the sr-rb25 conversion plate
today i got cracking on with the lower part of the front panel on the shell, i spent ages clean all the rust off cutting off the chassic ends, followed by some paint
on the upper front panel i had a couple of snapped studs, when the paint had dried, i drilled out the remaining parts of the studs and welded a bolt in its place, sorry about the crap pics was dark when i finished
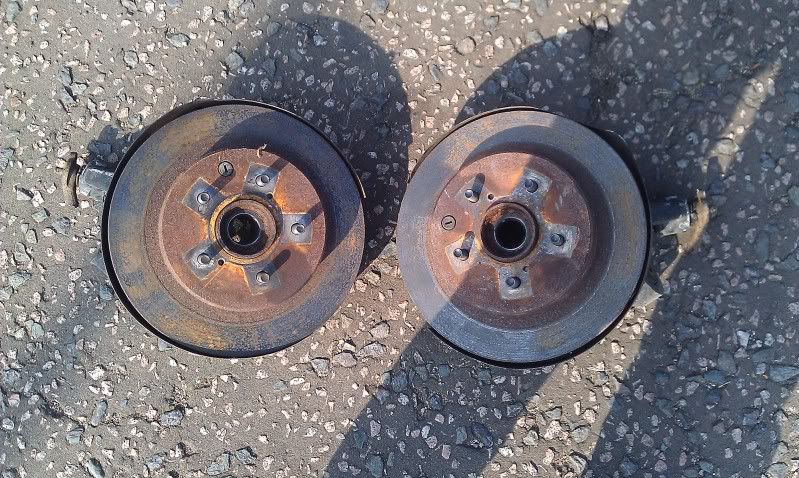
while the paint was drying i stripped down some spare rear hubs i had laying around, i have already burnt the bushes out just had to do someto remove the sleeves, so now there ready for sand blasters and powder coaters when i start the rear end
next weekend plans are to paint the upper front panel and inner arch, followed by some stone chip
Glad to see this still going
yeah mate its stilll going")
may as well update this
so i spent a weekend cleaning out all the underseal and sealer form both the fornt arches and cleaned the surface rust off the floor pan, gave them a coat of etch primer and a good coating of fresh underseal, did get as many pics as i'd like
drivers side
pass side
also cleaned up the power steering rack with new enery suspension rack bushes and fitted the front subframe and tension rod supports
big props to rockauto.com ordered 2 moog ball joints on friday night and had them at my door step tuesday morningtakes longer to get part form within the uk let alone the states
took another trip to the sand blaster and powder coaters and got the aircon rad and radiator support, front and rear ARB brackets and inner arch brake pipe bracket clean up and coated
last but not least sr20-rb25 gearbox conversion plate, just need a custom prop and manual spigot bush for the auto engine, which should be out the breaker next weekend

Looking mighty fine mate, keep it up
update
as of yesterday the engine is out of the breaker and is now in the garage waiting to be stripped down and brackets blasted powder coated, bolts zinc plated, painted rocker cover and will also be fitting a h-dev manifold, braided line and baffled sump
i sent the front and rear uprights to blaster and powder coaters the other week, went to go pick the and the first thing he said when he saw me was "SHIT i done them in black not white"will be picking them up on tuesday in white
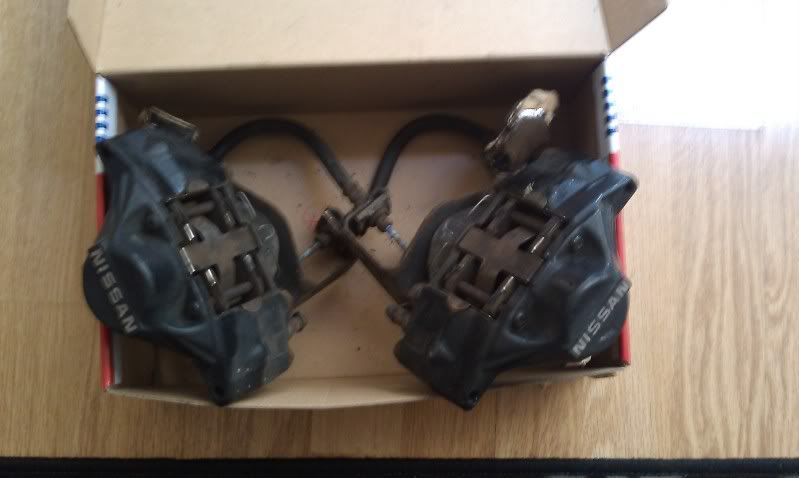
some may be aware that a neighbour of mine was breaking a 300zx TT, he had bought it for the engine for his other 300zx track car, basically he asked if some of parts are any good to me and i was likei walk away with AFM with as much wire i could get, whole rear braking set up and BMC and servo
another trip to DB-power saw me come home with braided front and s14-z32 rear braided brake lines to match the abs removal kit
i have also replaced the the boot interior with the interior out of the breaker as it was in better conditon and had all the clips for it, also replaced the passanger seat, drivers and passangers door cards as they were also in better condition

i love restoration work!
keep up the good work and keep us posted!
"If you don't fight for something, you'll fall for anything" - The Wise Man
Loving this, gives me some good ideas for my thing when I swap the front end! Keep up the gd work
cheers guys
update time, i'll try and get this in order
few weeks ago got the front and rear upright back from powder coaters, cracked straight on and fitted the front hub/bearing unit and bushes in the rear upright
i also cleaned up z32 BMC and gave the z32 servo a fresh coat of satin black, as you can see from the photo below there a noticeable size difference
and fitted just need to do the wiring now
and the missus for an early birthday present paid for all the wiring, so i could build my battery relocation kit, got all the info from s14 tech battery relocation thread and ordered all the bits from www.vehicle-wiring-products.eu apart from the circuit breaker that was from ebay, i'm going to try and mount a battery behind the drivers side quater panel trim
i split down the s13 rear hubs for the anchor bolts, as i sure i read somewhere that the z32 anchor bolt is to long for the s14 rear upright and if you wanted to use the z32 anchor bolts i would need to use spacers and while i had the s13 anchor bolts i may aswell you them, i only manage dto get 1 of the bolts out need to get hold of an impact gun to remove the other
and this weekend
i removed the rear subframe from the breaker today, burnt out the bushes and only managed to remove 50% of 1 slevee from the old bushes, it decided to piss down so will have to finish that one day this week
when it started it rain i put the subframe in the garage and started to remove the EGR vavle form the engine
fitted
removed
to blank it off i have a bit of aluminuim plate and have used the EGR gasket as template, all i need to do now is cut it out and fit with some instant gasket
thats all for now
Last edited by bluedanny; 31-05-2011 at 08:50.
coming along well mate, which brand of underseal did you use? Did you find it go rock hard or a soft rubbery finish?
Haha, I am telling you NOW you are going to hate white underbits when they get dirty
Good work dude!
i'm using 3M 08861, i believe it the harder stuff
yeah i know i will hate it, i only picked white so it would stand out when you look around the car
so today i got around to painting the front panel and inner arches
masked up
1 coat of etch primer and 3 coats of jet black later

 Posting Permissions

 Reply With Quote