


Yes good thanks man; just gently re-introducing myself to the fold in an attempt to get enthused about pulling the car out of storage! The car is A-OK, but needs a few bits doing before I'm happy with it (last time driven was Oct 2012!)

Yes good thanks man; just gently re-introducing myself to the fold in an attempt to get enthused about pulling the car out of storage! The car is A-OK, but needs a few bits doing before I'm happy with it (last time driven was Oct 2012!)
awesome mate, be nice to see the old girl out again mateOriginally Posted by Quail

just a small update. didn't get an awful lot of time on the car this weekend but managed to get a few bits done.
first of i started to have a another play with the headlights. chriscooke mentioned in a previous post that it was my hid's causing my headlights to turn off when the full beam is applied. i thought one quick way of telling if the hids were indeed causing this problem was to simply remove the hid's and refit some standard bulbs and try again.
and to my surprise when the full beam was applied again the headlights switched off again
so now I'm well and truly baffled, i stripped all the wiring back and thought id have a play about with all the wires incase I'd made a mistake somewhere when wiring them up. but no still the same problem. thought rather than waste anymore time scratching my head i decided to leave the headlights for now and ask all you sxoc'ers if anyone has any solution/ideas???
next i decided to finally fit my new heater matrix fittings. i left these with a mate to do a couple weeks back to try and come up with a solution to making them work. picked these up on friday night, not the prettiest to look at but none of it gets seen so not to bothered tbh.
fitted them to the matrix
then finally was able to connect up the water lines in the bay. another big tick crossed off the list
then got the breather from the rocker fitted. took a bit of fiddling to get it on but its now on and happy to say it clears the water lines and the down pipe
this now gave me the oppertunity to finally start with installing all the interior. got all the heater boxes and gubbins installed and semi got the crash bar inn. had a quick play about trying to get the dash inn but its going to take 2 people and think I'm going to run into a few problems fitting it as when we installed the dash around the cage before we had none of the heater units in the car to deal with so its now a little more tricky to get in and out. will try and get back down the unit again in the week for round two.
the dash however looks the f***ing bollox
Ive got loads of flocked bits to unwrap but I'm going to unwrap it as i fit them as they'll only get dirty in the mean time. however i couldn't resist to have a sneak peak at one of the door cards
certainly made all them hours i put into them worth it
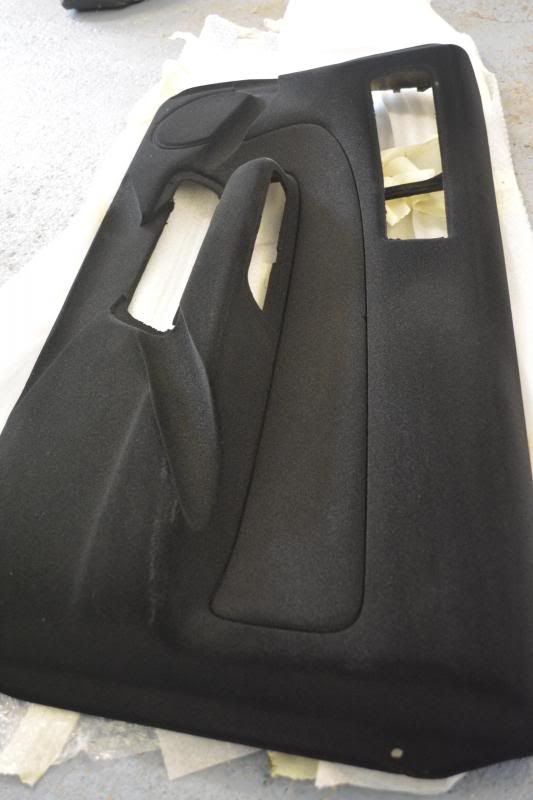
Those door cards have come out brilliantly mate. Good work
1998 Nissan 200sx s14a , 2000 std 5 speed with nismo supercoppermix clutch bn6 Sapphire Blue
Loving the water hoses buddy,really nice touch.
This build is epic, would love to get mine to this stage one day... Keep up the good work!
Nice work dude this is really coming along now, are you going to fire sleeve the breather hose as it gets super hot around the downpipe
Loving the work Nash
This may be totally unrelated but i know s14's when you turn the full beam on, the dipped beam turns off as they have a H4 bulb with a hi and low beam in one bulb. Are you using any of the S14 loom at all?
That could be why the dipped is turning off
Cheers Chris. Can't wait to see what they look like in the car now
Thanks mate, caused a few headaches but I'm glad I went ahead and done it now, certainly cleans the bay up a bit
Thanks man means a lot.
Thanks man. Probably will do mate yeah need to see if I have any -12 fire sleeve laying about first.
That could explain why it's doing it then. Tbh I'm not overly fussed if I can't sort it. Rarely used the hi beam before anyway as found the hids to be awesome at night without using full beam.
Only issue i can think of is that HID's dont like turning off then on suddenly so might have an issue down the line with a dead bulb or ballast if you flash people. Personally never had any issue in other cars with it an d as you say, HID's are good enough 1/2 the time anyway
I kept my hid's wired to my sidelights all the time, the sidelights don't cut out ever and they have to be on anyway to get the dipped beams on. I never had any trouble with the wires being small and melting or blowing fuses
JC SX
Never noticed the dipped beam issue! Will have to look into that
The car looks awesome btw!
I very much doubt it's to do with the loom that you sent me mate. Pretty sure it's down to the zenki loom and s14a loom being different. Like I said I'm not overly fussed if I can't solve it, will most likely leave it til the end of the build now, got loads of other things to worry about first.
Thanks for the comment anyway mate
Okay cool, was going to say the lights on my 14a don't turn off when main beam comes on! So must be due to the differences
PS. could you leave me itrader feedback?
unfortunately i haven't been on the car for a couple weeks due to holidays, work, etc. but managed to get down there this weekend, target for the weekend was to wire up the stack dash, and try and attempt to get the dash in the car.
so set about chopping up the oem clock loom and started to wire up the new stack dash, indicator light and battery warning light. turned out to be a bit of a headache trying to get everything to work together. eventually got it all working in sync though
battery warning light and indicator/hazzard light working
and the stack dash in all her glory
once i was happy that most of the soldering/wiring was done me and mitch attempted to fit the dash. this was a part of the build i wasn't looking forward to and as i expected it wasn't straight forward lol. when mocking up the dash when cutting it i didn't have any of the cage door bars in or any of the heater boxes in situ. after 4/5 attempts at trying to fit the bastard we just decided to remove the door bars and heater boxes and try again. with a few choice swear words and a lot of sweat the dash finally fitted over the cage. before the dash could be fitted in its final position the heater boxes and dash bar had to be reinstalled was a proper fiddly job getting everything bolted back up but got there in the end
starting to look like a car again now
doesn't seem like an awful lot got done but they turned out to be two big headaches lol. glad we got them sorted though, thats another couple items on the tick list done
it's looking good Nash
cheers for the pic of the coolant pipe, I have now modified the standard pipe to suit which I did not think would work. It now looks a lot better that the straight pipe I was using.
another parcel turned up last week, seeing as I've now ditched the standard clocks this now means I've got no fuel gauge. so decided to buy a stack pro control fuel level gauge to match the stack wideband gauge i bought from mitch.
got this and the wideband wired up and running
the camera has made them look super bright in the pics but i can assure they don't look that bright. with the fuel gauge being the pro control type, it means you can adjust the brightness so can always turn them down if need be, they also allow you adjust the warning colours for when you have a full/empty tank. I've removed the full tank warning (green in the picture) as feel no need for it really.
all thats left now is to buy a stack boost gauge for the last hole, whilst doing the other two gauges i also made a the connections ready for the final gauge so as and when i do get the last gauge it will plug straight inn
checked it all was all still working
next job is to propery mount the cage. I've had to buy some longer bolts as I'm adding extra plates to go under the car so I'm finding that some of the original bolts aren't quite long enough. was this is done the carpet can be properly fixed down then the rest of the interior and seats can go inn
Last edited by nash`s; 10-06-2014 at 19:33.
Looks the nuts mate!!
couple more things done this weekend. main aim for the weekend was to get some plates made/installed for the cage to go underneath the car. didn't get any pics of these as they're nothing special tbh. turned out to be a bit of a pig to fit as was fitting them on my own plus the door bars had to come back out to access some of the boltsoh well she's all bolted in for good now
next mini project was to find a place to mount the function buttons for the stack dash. rather than drilling holes in the dash somewhere i decided to keep them out of sight and hide them in the cubby hole under the stereo.
first task was to cut the top out.
i then cut a small piece of carbon fibre from some old sheets we have laying about in the unit. bonded this in place and drilled some holes out. quite pleased with the end result.
also had to make an extended loom for them seeing as they are now further away from the stack display.
next headache was to figure out how to mount the power fc commander. I've already got a phone style holder for it which i used to just stick to the dash but seeing as the dash is now flocked i can now longer do this, wasnt keen on drilling holes in dash either. so came up with this bracket.
managed to find an unused bracket on the dash bar so was just a case of bending the metal into place and nut-bolting it to the dash bar. quick test fit before i painted it black.
once painted i simply unscrewed one of the screws on the back of the apexi holder and rescrewed it with the new bracket applied.
pleased with the outcome
just need to route some of the loom better then i can start to install more of the interior trim. got a few other small bits done but thats it for now.
Great attention to detail. Loving the door cards!
Sent from my iPhone using Tapatalk
cheers clivemight fit one of the door cards tomorrow, see how my day goes.
few bits done today.
first up after giving up hunting for a non abs hub i finally got my hands on a abs hub. the original non abs i had buckled when trying to remove the bearing.
seeing as I'm not running abs i cut of the abs ring
then i cleaned the hub up and gave it a lick of paint.
will be fitting this on the car tomorrow which means the car can 'finally' be lowered back down on all for wheels
the final gauge turned up in the post yesterday
managed to find a place in the bay to situate the control box out of sight, then set about modifying the loom that stack supplied.
the plug for the control is rather large and won't go through any of the holes in the firewall so rather than run all the wires from the bay into the car i cut the control box loom in half then decided to use some spade connectors to rejoin the loom back up. doing it this way ment the spade connectors will easily pass through the hole in the firewall and will make it a hell of a lot easier to remove the gauge without having to disconnect every wire to be passed through the bay. another reason i chopped the loom is that i wasn't keen on having any exposed wires in the bay so grabbed some spare braided loom sleeving.
once all the wiring was sorted was just a case of connecting it all up
then moved onto installing more interior trim. freshly flocked glove box.
then fitted the stereo, stack function buttons and avcr. was a but of nightmare getting everything connected up but I'm pleased with the outcome.
final test to make sure everything works
more updates tomorrow hopefully.
 Posting Permissions

 Reply With Quote


