Results 1 to 18 of 18

Thread: S14 simple boost leak test how-to

  1. #1
    Guest Si's Avatar
    Join Date
    Jan 2005
    Location
    Zanussi service centre
    Posts
    39,280
    Rides
    0

    S14 simple boost leak test how-to

    Right, as it gets asked almost every week, and I had to test my crapheap, I thought I'd take a few photos and do a quick walkthrough of how to check for boost leaks with the stock WMIC setup.
    I've aimed it to be quite simple, as it seems this is often the first thing people have to DIY on 14's!

    Tools needed:
    • 8 + 10 mm sockets
    • Couple of screwdrivers
    • A footpump/trackpump/portable compressor thing. One with a pressure gauge is best.
    • Some of my other half's gran's plum jam.
    • Some Old El Paso Salsa (Mild).
    • An RX7 gearbox drain plug.


    The last three items are optional. They can be replaced. Basically, what you need is a selection of jars and bungs that can be used to plug the various hoses that need plugging.

    It's worth noting that I'm currently running grumpy spec pigeon on my car - as a result, if you have an aftermarket DV, or the OEM one, you'll need to remove it and plug that too.

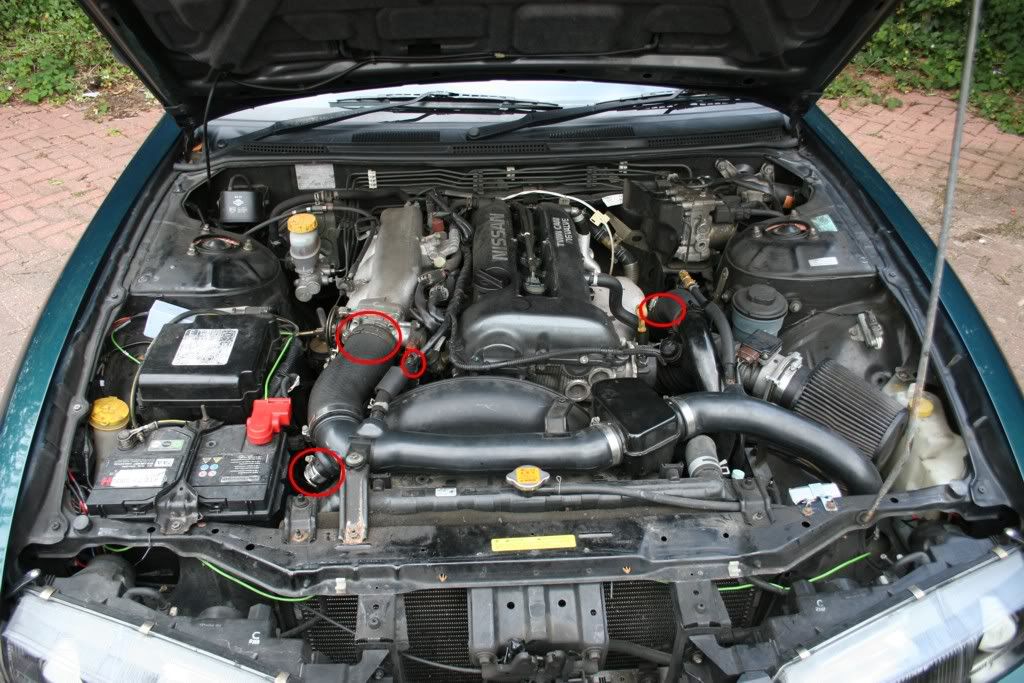
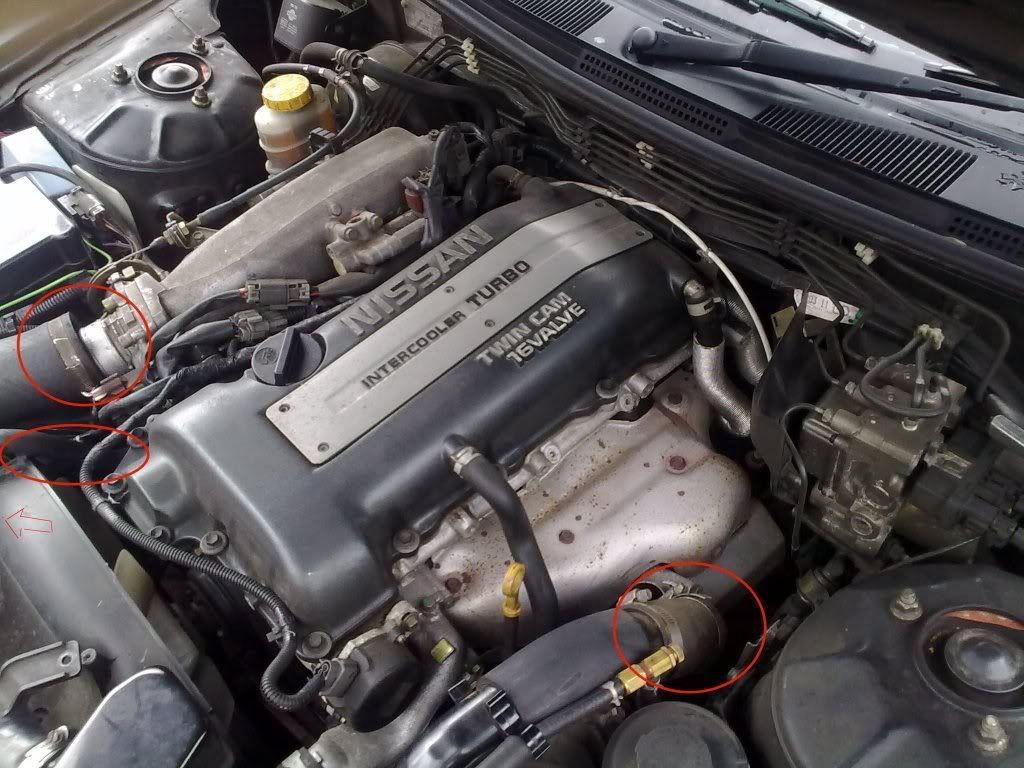
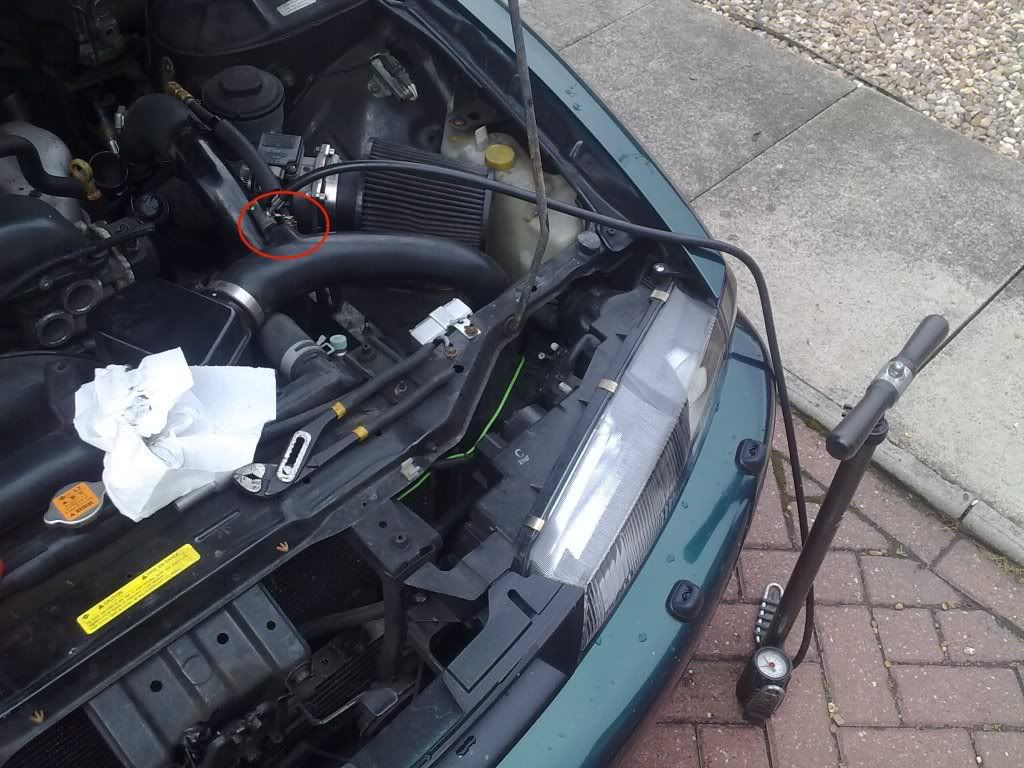
    The four main bits you need to bung up are circled below:


    First, undo the two supports that hold the OEM pipework on top of the rad - one bolts to the cowling, the other to the slam panel.

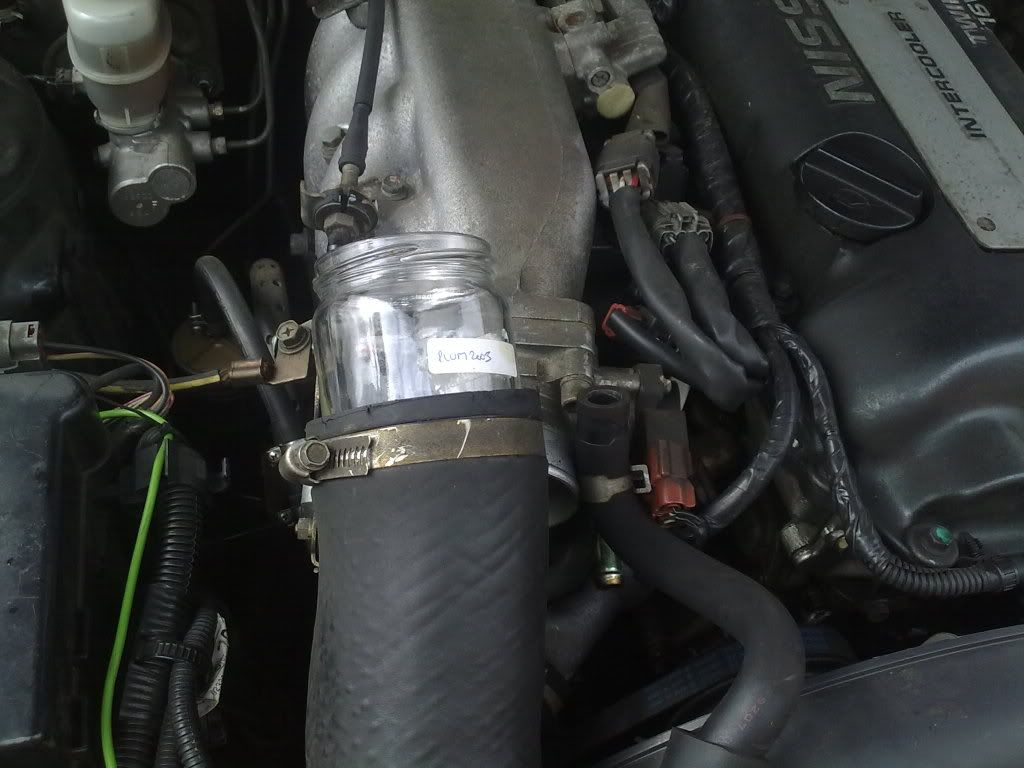
    Then, you need to undo and release the throttle body hose, idle air take off, and turbo outlet (and DV if you have it).


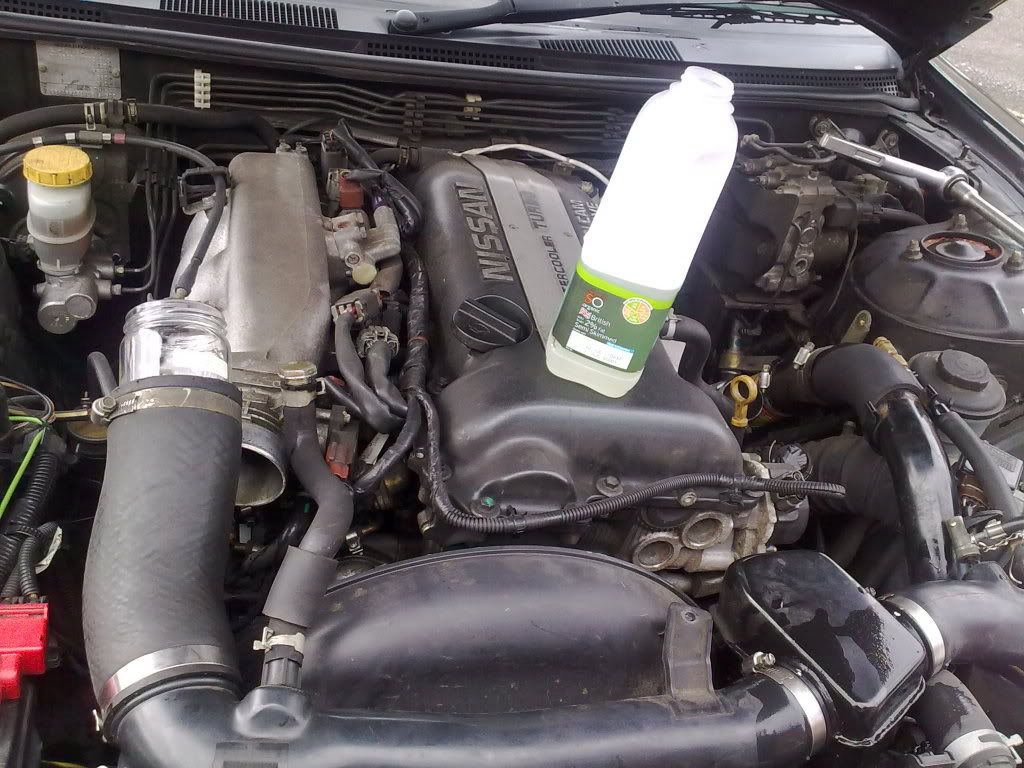
    Then, bung these with a selection of jars and round things. A jam jar is typically the right size for the TB hose. The easiest way to get to this is to release the jubilee at the other end, twist the pipe round, then do it back up.


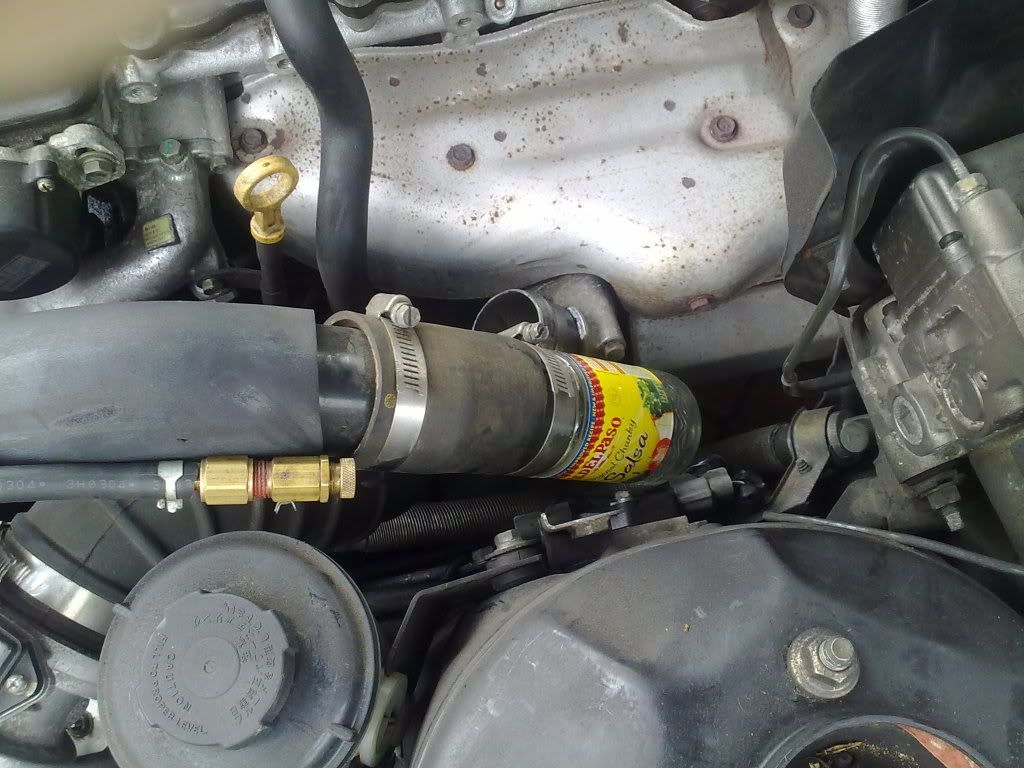
    The turbo end is sort of aerosol size - a small can of 3 in 1 or small jam jar works perfectly.


    The idle take off can be blocked with a big fat magic marker or sump plug.

    Bung the DV up as well if it's not already

    The next step is to pressurise it. Remove the vacuum line that goes to the stock boost solenoid pipework/Bren device/EBC/whatever, and attach the pump to this.


    I pumped it up to about 1.4 bar, then left it, to see if it held.
    A solution of washing up liquid and water is dead useful here - pour it over the various joints to find any small air leaks


    That's it really Refitting is reverse of removal!

    HTH

  2. #2
    Banned sideways14a's Avatar
    Join Date
    Apr 2003
    Location
    Drunk as usual
    Posts
    34,697
    Rides
    0
    Nice one, i was going to do a write up about this as well (but using a tyre inflater cos i am a lazy 'tard )

    Might save my f11 key (boost leak button)

  3. #3
    Guest Si's Avatar
    Join Date
    Jan 2005
    Location
    Zanussi service centre
    Posts
    39,280
    Rides
    0
    Tyre inflator is fine and dandy

    I need to find a photo of my little adaptor that I've made that means you can use this method on FMIC pipework without a take-off.

    Oh, and as a slight aside - if you find small leak that won't go away with just tightening the jubilees around the resonator pipe (cheers Nissan, for that plastic on metal join ) first try pouring hot water over the pipes, then tightening, and if that doesn't work, wrap a couple of layers of leccy tape around the joints, and tighten - it should keep the leaks at bay

  4. #4
    Guest minwaash's Avatar
    Join Date
    Jun 2008
    Location
    Hinckley, Leics
    Posts
    518
    Rides
    0
    suprised there isn't a hummus container jammed in there somewhere

  5. #5
    Guest Si's Avatar
    Join Date
    Jan 2005
    Location
    Zanussi service centre
    Posts
    39,280
    Rides
    0
    Note the organic milk

  6. #6
    Guest marko14a's Avatar
    Join Date
    Jun 2008
    Location
    Ossett, West yorkshire
    Posts
    4,481
    Rides
    0
    For a FMIC do you pressurise back through the actuator line?

  7. #7
    Guest
    Join Date
    Nov 2007
    Location
    Warrington
    Posts
    1,027
    Rides
    0
    Thats how i pressurised mine. However word of warning on the plugs if they do pop out they do so with some force mine did and hit me square in the chest. Was a bit winded after that and a nice bruise.

  8. #8
    Guest Hesky's Avatar
    Join Date
    Mar 2007
    Location
    Worcestershire
    Posts
    1,317
    Rides
    0
    I would do a test with the recirculating DV in situ and also removed, this way you can diagnose any issues which could be related to a weak DV that wont hold boost

  9. #9
    Guest immy21's Avatar
    Join Date
    Mar 2009
    Location
    Edinburgh
    Posts
    7,176
    Rides
    0
    This should replace the original sticky, Mods?

  10. #10
    Guest DJFarmo's Avatar
    Join Date
    Sep 2006
    Location
    Banbury
    Posts
    281
    Rides
    0
    Thanks for this idiot's guide to pressure testing the intake system.

    My only question is, how did you attach your pump to the vacuum line? Did your pump have a standard car/bike tyre locking valve attachment on the end and you managed to make that work? Or did you have to put something else on the end of your pump to make it suitably fit the vacuum line?

    Quote Originally Posted by Si View Post
    The next step is to pressurise it. Remove the vacuum line that goes to the stock boost solenoid pipework/Bren device/EBC/whatever, and attach the pump to this.

  11. #11
    Guest IrishPaddy's Avatar
    Join Date
    Oct 2005
    Location
    Dublin.
    Posts
    2,287
    Rides
    0
    i had to do this a year or 2 ago... my neighbours were wondering why the hell i had jars of jam and mustard hooked up to the car

    great write up

  12. #12
    Guest Si's Avatar
    Join Date
    Jan 2005
    Location
    Zanussi service centre
    Posts
    39,280
    Rides
    0
    The pump I used does both valves - Schrader and Presta. The Schrader (car type) one uses a push on fitting with a thumb lever that locks it on (rather than screw on).

    It's the same system that a lot of foot pumps and portable 12v inflators use

  13. #13
    Guest
    Join Date
    Apr 2006
    Location
    Glasgow-shire
    Posts
    1,974
    Rides
    0
    Good guide, been meaning to do mine for a while

    Can I order one jar of your other half's gran's plum jam please?

  14. #14
    Guest
    Join Date
    Nov 2008
    Location
    cork, ireland
    Posts
    190
    Rides
    0
    very good guide!! well done

  15. #15
    Guest S14aDave's Avatar
    Join Date
    Nov 2006
    Location
    Nissmann Garage
    Posts
    379
    Rides
    0
    Just thought i would add..... Be carefull if you have a carbon bonnet!

    I did this, then launched a tin of chilli at 10psi straight at the underside of the bonnet, which luckily wasn't carbon

  16. #16
    Guest
    Join Date
    Jan 2008
    Location
    Saffron Walden
    Posts
    2,502
    Rides
    0
    Yeah definately be careful when doing this guys. Myself and a couple of mates once did a boost leak check on a Starlet gt and took the pressue up over 2bar, as he runs quite a lot of boost. Needless to say that getting a metal 3" adapter in the face is not the ideal thing to happen to you.

  17. #17
    Guest anton87's Avatar
    Join Date
    Dec 2013
    Location
    Watford
    Posts
    102
    Rides
    0
    nice guide

  18. #18
    Guest silverzx's Avatar
    Join Date
    Feb 2010
    Location
    Somerset
    Posts
    1,309
    Rides
    0
    Pictures don't work for me?

Posting Permissions

  • You may not post new threads
  • You may not post replies
  • You may not post attachments
  • You may not edit your posts
  •